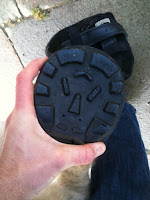
1) Ensure your boot is fully open and all the fastening is undone (if using a trainer type boot, ensure the inner tab is flexed away from the center of the boot. If your boot came with pastern wraps, leave them off to check the fit, and add them in later. Design permitting, fold the outer down over the sides of the boot before attempting to fit.
2) Holding your horse's pastern with one hand, use the other to maneouver the boot over the foot toe-first. It is very important that the toe is fitted into the toe of the boot or there may be chafing or damage to the boot.
3) Once the toe is in, bring the heel into the back of the boot (if you are using a compression-fit boot, there is usually a ridge here to grip onto the heel/frog). And roll up the outers if you had folded them down initilally, but do not fasten yet.
4) *for trainer-style boots only* Grip the bottom of the boot and rotate it around the foot- there should be enough play to turn it 20 degrees or so but not enough to rotate it around the foot. Other styles should have little or no rotation when fitted to the foot. (In the case of Easyboot Gloves, I highly recommend gettinga rubber mallet to tap them into place so that you get adequate heel grip).
5) Gently lower the leg down and allow the horse to put his weight into the boot.
6) Lift the leg and check the fit again, if you got the hoof position correct the first time, the fit should remain the same.
 7) Gently lower the leg and fasten the boot. If using trainer-style boots, ensure there is two-fingers' worth of space between the fastened outer and the pastern to avoid chafing.
8) Assuming that everything has progressed well and seems to be fitting properly fit the pastern wraps, repeat the process on the other foot/feet and take them out for a short test ride (though, with the trainer-style boots especially, keep the sessions/intensity short until the material has had a chance to break-in... usually about a fortnight).
9) Ride and enjoy!
If you have any doubt, always check with an appropriate hoofcare professional or the company help desk.
If your horse has feet that are inbetween sizes, I recommend using some closed-cell foam padding (or a gardening kneepad at a push) and cutting a wedge to glue in the loose side of the boot- though this is only really an option with trainer-style boots as they are more forgiving with their fastenings... if it is an intereference-fit type boot you may have to change to a different style.
Maintained properly (ie regularly hosed out and dried), boots should last about 1-3 years depending on workload and frequency of use (Zeno's Cavallos lasted 2 1/2 years of hard work before we had to replace them due to a hole in the uppers), so are great value for money.


No comments:
Post a Comment